Thursday, October 8, 2015

Chicken Tikka Masala


The weather is getting colder and in our house that means time to crank up the crock pot a bit more often. We love Indian food, but if you want to go authentic it is really labor intensive. Don't get me wrong, authentic is awesome. Unfortunately for most people you just don't have the time to toast and grind whole spices before your one-year old breaks your 4'x 6' picture window with a wooden spoon. 

Yes. That happened in our neck of the woods.

Tikka Masala is a tomato based curry that delivers Indian food flavors at their finest. Spicy. Sweet. Fruity. Earthy. Hopefully you find this recipe just as tasty if not better than the "real" thing. The unbelievably tender chicken this recipe yields comes from long hours of low and slow cooking and also the time it gives the spices to meld and develop. Never tried Indian food before?  Then now is definitely time! If you have never made the leap, it’s likely you have tried the spices it contains in several separate dishes. Indian food combines all those rich spices into one amazing dish. It's OK. You can do it. Go on and excite your taste buds with this flavorful, spice packed Indian dish.

This recipe makes a ton of Tikka. Get ready for leftovers or if you aren't a leftover fan, you might consider cutting the recipe in half.

The engine that drives the Tikka Masala train is the curry mixture know as Garam Masala. While two spice mixtures are the same, Garam Masala usually contains: black and white peppercorns, cloves, cinnamon, nutmeg, coriander, cardamon, bay leaf and cumin. Garam means "hot" and Masala means "spice mixture". Real complicated, right? Most large grocery stores have an Indian section where you should be able to find it, but if you live in the Wichita area it's worth a trip to The Spice Merchant & Company.


If you haven't been to The Spice Merchant and you live within an hour of Wichita, get in your car right now. Seriously. Load up the kids and head towards downtown Wichita. The Spice Merchant is a menagerie of spices, teas, coffees and culinary trinkets. A veritable buffet of delectable goodness just waiting to go home with you and to make you kitchen smell incredible! I promise Garam Masala won't be the only thing you leave with. 

Sidenote: If you are a serious coffee drinker (read: coffee snob), then this is a must visit location for you. Whole beans from all over the world. Take them home as is or they will grind them right if front of you to your specifications.


Ingredients


  • 1 package of boneless, skinless chicken thighs (2-3 lbs) cut into 1" chunks
  • 1/2 large yellow onion, finely diced
  • 4 cloves garlic, minced
  • 2 Tbsp freshly, finely grated ginger
  • 1 (29 oz) can tomato puree
  • 1 1/2 cups plain yogurt (I use Greek)
  • 2 Tbsp extra virgin olive oil
  • 2 Tbsp lemon juice
  • 2 Tbsp Garam Masala (See note above)
  • 1 Tbsp cumin
  • 1/2 Tbsp paprika
  • 2 tsp salt, or to taste
  • 3/4 tsp cinnamon
  • 3/4 tsp freshly ground black pepper
  • 1-3 tsp cayenne pepper (3 tsp is SPICY - I'd go with 1-1.5 to start)
  • 2 whole bay leaves
  • 1 cup heavy cream
  • 1/2 tbsp cornstarch
  • Long Grain White Rice or Basmati Rice

  • Naan Bread (Optional - Not really, you MUST have this with the dish!)
  • Chopped cilantro for garnish (optional)

    Click here for a PRINTABLE RECIPE.

Chicken Thighs

If you have never cooked with chicken thighs before, after this you will to yourself "where have you been all my life?". Warning: They are DARK meat and therefore contain more fat than say chicken breasts, but fat is flavor and they become moist deliciousness in the world of a crockpot. And the best part... They are cheaper than chicken breasts and probably located right next to them in the meat department. As you can see above, I would use a pair of kitchen shears to trim off any excess fat on the edges of each thigh before you cut them into chunks.

Fresh Ginger

The top piece is what you should look for in the grocery store. It has a tough brownish skin and is very knobby. You will probably find it near the mushrooms. They come in big pieces and and sold by the pound. You DON't have to buy the entire 6" piece. Just snap off a section the size you need (see above) and away you go. At home, use a vegetable peeler to remove the tough outer skin before grating. If you have a micro-plane, that could work too. Watch your fingers! 


Naan Bread


Naan is a flat bread that is traditionally served as a side dish in Indian cuisine. It is great to use as a "scoop" with curries. I would warm it up in a 400 degree oven for a few minutes before serving. You should be able to find it in your bakery department. Usually its near the tortillas. It is a MUST HAVE with this dish. Trust me. Go get some. 


In your crock pot, add chopped onions, minced garlic, grated ginger, tomato puree, yogurt, olive oil, lemon juice, Garam Masala, cumin, paprika, salt, cinnamon, pepper and cayenne pepper. Stir until combined.


Add diced chicken thighs and mix until they are well coated with sauce. Now add the bay leaves (leave them whole, you are going to remove them later). At this point, you can refrigerate it overnight and start it in the morning or get it cooking now if you are ready.

Cook on LOW for 6-8 hours.


Remove the bay leaves before you do anything else!


In a bowl, whisk together heavy cream and cornstarch, pour mixture into slow cooker and gently stir. 


Allow mixture to cook 20 minutes while you prepare your rice (see Coconut Curry Recipe for info on rice cookers).

Tikka Masala with steamed carrots and cauliflower and Naan bread.
Serve over rice and top with chopped cilantro (if you like it, I don't). Enjoy!


Saturday, September 19, 2015

Chicken Enchiladas


It has been quite some time since my last post. Like many of you I'm sure, things have been incredibly busy since school started. Along with the normal hustle and bustle of getting the school year off of the ground, I have taken on some additional extra-curricular responsibilities as the Student Council sponsor and I decided to  start working on my Masters degree as well. Good timing right? I am happy with how it has all started, but needless to say my free time has been few and far between. I am glad to introduce my newest post, chicken enchiladas with red sauce. The chicken cooks in a homemade red enchilada sauce and with a little work, is made into a tasty casserole dish full of cheesy (and slight spicy) chicken enchiladas.


Ingredients


1 package of soft taco size tortillas (8-10 & I used corn, but have also used flour - Your preference)
2-3 lbs of boneless, skinless chicken thighs
14 oz can Rotel (diced tomatoes with green chiles - drained)
14 oz of tomato sauce
3/4 cup water (I pour it into the tomato sauce can and swirl it to pick up any leftover residue)
3 TBSP Chili Powder (4 TBSP if you like more heat)
1/2 tsp oregano
1/2 tsp cumin
1/2 tsp garlic powder
1/2 tsp salt
1/2 tsp black pepper1 diced onion
8 oz block of pepper jack cheese (shredded)
8 of block of monterey jack cheese (shredded)

Click here for a PRINTABLE RECIPE.

A few notes on the tortillas. I used corn in this blog post, but we often use flour. Generally people are decisively in one camp or the other when it comes to tortillas. I think corn tortillas have better flavor and texture, but are certainly more fragile and less pliable than flour. The flour tortillas definitely hold together much more easily and are therefore more user-friendly when it comes to filling and rolling the enchiladas. Your choice. You won't be disappointed either way.

Also, I highly recommend buying your cheese in blocks and shredding it yourself. When cheese is produced, it gets sprayed with a thin film of wax as a preservative. Store bought shredded cheese doesn't melt nearly as easily or smoothly because each shred is covered in wax. A full block however, only has a coating on the outside. If you shred it yourself, it will melt much more evenly and results in that stringy, stretchy cheesy goodness we all love. Trust me. A little more work will go a long way.


Add the tomato sauce, water, chili powder, oregano, garlic powder, cumin, salt, black pepper and diced onion to the crockpot. Stir until combined.


Add the chicken thighs and stir to coat. At this point, you could refrigerate this overnight and start it in the morning before you head out the door for work if you wanted.


Cook on LOW for 6 to 8 hours. Hopefully you get something like this. I know, it doesn't look that appetizing right, but just wait. I promise. Your patience will be rewarded!


Remove the chicken thighs from the crockpot, place them in a separate bowl and use two forks to pull the chicken. Leave the sauce in the crockpot and turn it off.

Add 1/3 of the crockpot sauce and the can of drained rotel to the chicken and stir to combine. This is going to be your filling for the enchiladas.


Take 1/2 of the remaining sauce and spoon it into the bottom of a 7 x 11 casserole dish. Try to get mainly sauce and leave the other goodies in the crockpot. We'll use them later!


Add roughly 1/4 cup of the chicken filling to the tortilla and shape it into a long rectangle (see picture above) and add a 1/4 cup of the pepper jack cheese. Roll and add seam side down into the sauced 7 x 11 pan. Repeat for all enchiladas. It should make 6 to 8 total. If you have leftover filling, I'm sure you'll figure out what to do with it.  


Place your rolled tortillas in the pan and cover with the remaining sauce from the crockpot (don't leave any goodies left in the pot). Then, cover with the shredded monterey jack cheese. 


Bake at 400 degrees for about 10 minutes and the cheese is melted and bubbly. 

Chicken enchiladas with red sauce, Mexican rice and salad

Top with sour cream (if you'd like), serve and enjoy!

Thursday, August 20, 2015

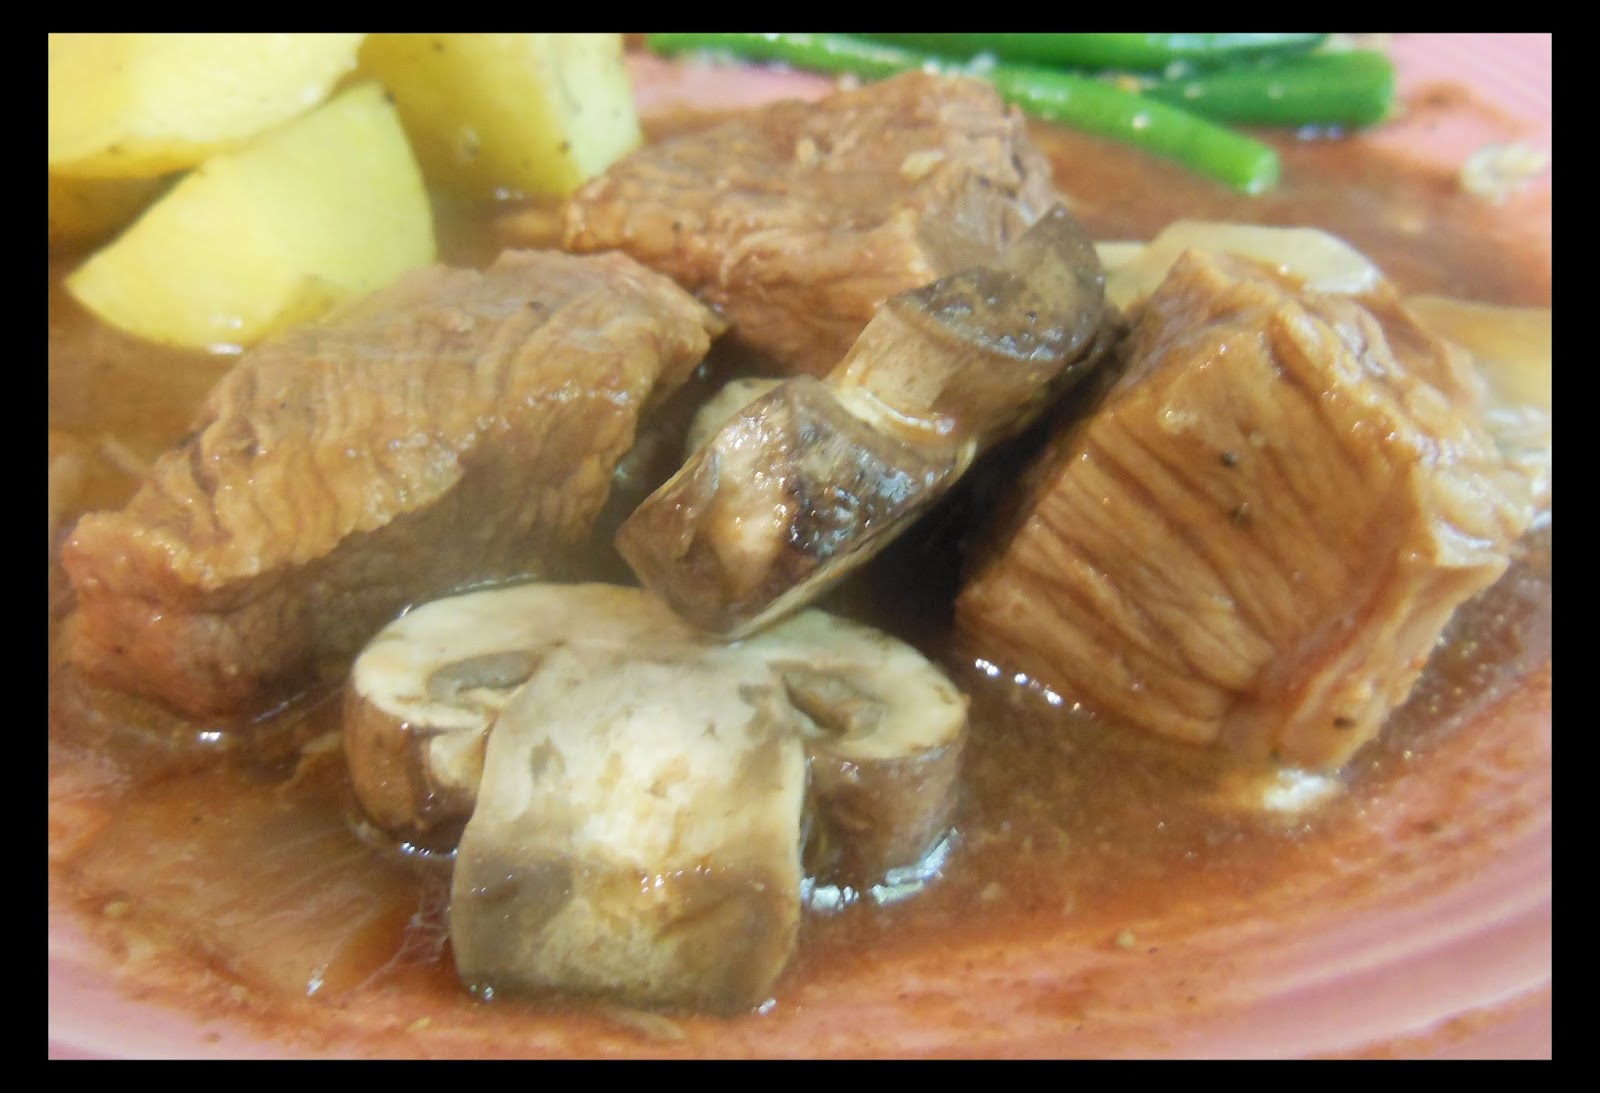
Beef Tips with Mushroom Gravy


I don't know about you, but I have been enjoying October evenings in August this week. I woke up to a 58 degree morning. 58 degrees! On August 20th! In South-Central Kansas!  I honor of our cooler weather, I made a hardy comfort food meal that is usually reserved for late fall or early winter. Beef Tips with Mushroom Gravy. If you aren't so keen on mushrooms, you can always leave them out. When I first was considering experimenting with this dish, I perused the internet for ideas about ingredients, cuts of meat, etc. I think every recipe I came across included a packet of french onion soup mix and a can of cream of something. Over and over. Have no fear there will be no cream of anything here! (See what I did there?) 

This dish does only require 6 hours of cook time on LOW because I wanted the Beef to come out as "tips" (solid pieces) versus just shredding into pulled beef. 6 hours was perfect. They were still fork tender, but held together when I took them out to make the gravy. I did use a cut of meat called "Beef Chuck Shoulder Cross Rib Cut". I is essentially pre-cut strips of beef chuck shoulder. You could use a whole beef chuck shoulder as well. The pre-cut strips just saved me some knife work. Hope you enjoy!

Ingredients


2-3 lbs of Beef Chuck Shoulder (Cross Rib Steak if you can find it)
28 oz of beef broth
1 6 oz can tomato paste
6 carrots (peeled & rough chopped)
1 yellow onion (peeled and rough chopped)
4 garlic cloves
8 oz of mushrooms (white or baby bella)
1 tsp Worcestershire sauce
1 tsp kosher salt
2 tsp black pepper

For cornstarch slurry to thicken gravy
2 TBSP corn starch
2 TBSP cold water 

Click here for a PRINTABLE RECIPE.


Mix beef broth, tomato paste, onions, carrots, garlic, salt and pepper in a bowl until the tomato paste is combined with the broth.


Cut the beef into 1" to 1.5" cubes and add to the crockpot.


Add the broth & vegetable mixture and stir. Try to keep the beef submerged in the liquid if possible. Cook on LOW for 6 hours.


After 6 hours, removed the beef tips from the liquid and add the mushrooms and cornstarch slurry (see below). Stir and cook on HIGH for 30 minutes or until gravy thickens to your liking. Then add the beef tips back to the gravy and stir to coat them with gravy.

Cornstarch Slurry: Mix 2 TBSP Cold Water & 2 TBSP Cornstarch

Most of the time, a cornstarch slurry has 2 parts water and 1 part cornstarch, but this gravy need some serious thickening power. Be sure to make the slurry in a cup first, then slowly add it to the liquid while stirring it in.

Beef Tips with Mushroom Gravy - Roasted Potatoes - Parmesan Garlic Green Beans
Serve and enjoy!

Thursday, August 13, 2015

Pulled Pork


Well, I went back to work this week and that means a few things in our house. Summer is for all intents and purposes over, school is about to start and the amount of time we have to cook is about to be drastically reduced. This one may be the easiest and fastest of them all to prepare. Mix spices, rub pork, refridgerate overnight & cook. I love barbecue, but no one has decided to drop off their smoker in my driveway and let me use it for a few years. So this is a pretty good substitute when it comes to lip-smacking good pulled pork. We like it in a sandwich, but it is certainly good enough to consume all by itself. Kids show up in our building on Tuesday, so here's to 4 more days of summer. Enjoy.


Ingredients

1 Pork Shoulder(Boston Butt) or Sirloin Roast (5 to 8 lbs)
2 TBSP brown sugar
2 TBSP white sugar
1 TBSP kosher salt
1 TBSP black pepper
1 TBSP chili powder
1 TBSP garlic powder
1 TBSP cumin
1 tsp crushed red pepper
1 tsp paprika
1 tsp cayenne pepper

Click here for a PRINTABLE RECIPE.

A few notes on the meat. A Pork Shoulder is often times labeled as a "Boston Butt" or "Shoulder Butt". You could also use a sirloin roast if you can't find a shoulder. More than likely, it will also be "bone-in". Meaning the shoulder blade will be inside the meat. No problem. You will easily be able to pull it out during the pulling process after it has cooked. You can buy whatever size you'd like, and they can be up to 15 lbs! If you can't find one small enough, take it to the meat counter and have the butcher cut it into smaller pieces for you. Cook and what you need and freeze what you don't. DO NOT attempt to remove any of the fat cap before cooking! Much of it will render down in to the pork and make it ridiculously tasty.

This is WAY better if you make the rub, apply it to the pork and then refrigerate it overnight in the crockpot.


Mix all of the spices together in a bowl to make the rub.


Remove 1 heaping TBSP of the rub and set aside for later.


Sprinkle the rub on all sides of the pork.


Now it's time to get messy and use your hands to rub it into the meat. Channel your inner massage reflexologist. With the moisture from the pork, it will make a paste on the outside of the pork butt.

Refrigerate Overnight

Cook for 8-10 hours on LOW the next day.


Hopefully you should see something like this. Don't pour off the liquid before you pull the pork and let it reabsorb all of the juices that it can. You should be able to take a pair of tongs and pull the shoulder blade right out. If it doesn't just fall out, you need to cook it longer.


Use 2 forks to pull the pork it pieces of your liking. Again, DON'T pour off the liquid until the meat has a chance to soak up as much of that goodness as possible.


Once you have pulled the pork and let it reabsorb the juice, you can pour off any excess liquid you don't want. Then add the heaping TBSP of rub you set out and stir it in. You did remember to set out the extra rub? Right?

At this point it is ready to serve. I like it as is. Toast a nice roll and pile it on. In our house we put the BBQ sauce and mustard on the table for people to use at their own discretion, but here are some sauce variations if you are interested.

Saucy Pulled Pork: Add 1/2 cup of your favorite BBQ sauce and stir
Carolina: Add 1/4 of both apple cider vinegar and mustard and stir
Spicy: Add 2 TBSP hot sauce to either above or straight to pork 

Pulled Pork Sandwich with Roasted Yukon Gold Potatoes and Sweet Corn